Showing posts with label EBusiness 11i. Show all posts

Saturday, January 12, 2008

What is Oracle Apps (ERP)?

Lets take an example. Suppose you are running a small grocery shop named “Janata Grocery”, so the typical operation as a shop owner is you basically buy groceries from some big seller and stock it in your shop. Now people come to your shop for day-to-day needs and buy stuff from your shop at a slightly higher price than what you originally bought and stocked it in your shop.
Ocassionally you may not be carrying items or run out of stock that people ask for so you make a note of it and promise the person to come back tomorrow and they will get their item. So far so good, now lets name some entities before we proceed and things get complicated. The big seller from whom you buy stock is called as Vendor, the people who come to your shop to buy things are known as customers, the stock in your shop is known as inventory.

So far we have identified few entities that play an active role in your day-to-day operations. As time goes by, your business expands and now you take orders over the phone and provide service to deliver the items to your customers, so you hire people to help you out in maintaining the inventory, do the delivery part and all the necessary stuff to keep the business running smoothly. The people you hire are known as employees.
So in this small shop, you typically manage the bookkeeping activities by hand using a notepad or something similar. Now imagine the same setup on a larger scale where you have more than 10,000 customers, have more than 1000 vendors, have more than 1000 employees and have a huge warehouse to maintain your inventory. Do you think you can manage all that information using pen and paper? Absolutely no way! Your business will come to a sudden stop sign.
To facilitate big businesses, companies like Oracle Corporation have created huge software known in the category of ERP (Enterprise Resource Planning) as Oracle Applications. Now coming to think of it, Oracle Apps is not one huge software, instead it is a collection of software known as modules that are integrated and talk to each other.
Now what is meant by integrated? First let us identify the modules by entities. For e.g Purchasing and Account Payables deal with the vendors since you typically purchase from vendors and eventually have to pay the dues. Oracle Purchasing handles all the requisitions and purchase orders to the vendors whereas Oracle Accounts Payables handles all the payments to the vendors.

Similarly Oracle Inventory deals with the items you maintain in stock, warehouse etc. Dealing with customers is handled collectively with the help of Oracle Receivables and Oracle Order Management. Order Management helps you collect all the information that your customer is ordering over the phone or webstore etc whereas Receivables help you collect the money for the orders that are delivered to the customers.
Now who maintains the paychecks, benefits of the 1000 employees? right! it is managed by Oracle Human Resources. So you get the idea by now that for each logical function there is a separate module that helps to execute and maintain that function.
So all the individual functions are being taken care but how do I know if I am making profit or loss? That’s where integration comes into play. There is another module known as Oracle General Ledger. This module receives information from all the different transaction modules and summarizes them in order to help you create profit and loss statements, reports for paying Taxes etc.

Just to simplify the explaination, when you pay your employees that payment is reported back to General Ledgers as cost i.e money going out, when you purchase inventory items the information is transferred to GL as money going out, and so is the case when you pay your vendors. Similarly when you receive items in your inventory it is transferred to GL as money coming in, when your customer sends payment it is transfered to GL as money coming in. So all the different transaction modules report to GL (General Ledger) as either “money going in” or “money going out”, the net result will tell you if you are making a profit or loss.

All the equipment, shops, warehouses, computers can be termed as Assets and they are managed by Oracle Fixed Assets. Initially Oracle Applications started as bunch of modules and as time passed by they added new modules for different and new functions growing out of the need for today’s internet world.

So if you come across a module that you are trying to learn and work on, first try to understand what business need is it trying to fulfill and then try to understand what the immediate modules that it interacts with. For e.g lets say you come across Oracle Cost Management module, you will learn that it helps to maintain the costs of items in your inventory and the immediate modules that it interacts with are Oracle Inventory (ofcourse), Oracle Bills of Material, Order Management and so on..

There is more to ERP than this layman explanation of a complex beast that does not justify a single bit but I wished I had this knowledge when I was thrown into Oracle Applications right after I graduated from college. Back then the only piece of software I had known to write was implementing binary trees, infix, prefix, postfix notations in pascal and TSRs (Terminate and Stay resident) using assembly.

Thursday, January 10, 2008

Installing Oracle Applications E-Business 11i on Windows XP / Windowws 2003 Server

Hi! you will be able to install EBS 11i on Windows XP/ Windows 2003 Server, if you just follow these instructions else you should not get into it.

System Requirements Hardware used.

Windows XP (professional or Home) Service Pack 2 with 1 GB RAM ( you can do it on 512 MB also but not at all efficient) and make sure you have NTFS file system.
HD min 150 GB (c’mon your system and staging also need some space don’t agree with who says it work 100 GB with vision DB). You can use external hard drive too.
Don’t listen to those who advise you to install EBS 11i without vision database. I know
you are installing all this for learning etc.

Very Important.

Make sure there is no oracle product installed on your system. No entry of oracle should be in windows registry except system default by windows itself. So it is recommended to use fresh system for this purpose. If you tried a failed installation before on your PC then reinstall the OS (Win XP) again otherwise you will waste your time.

There should be !!!!NO!!! JDK installed on your machine. EBS 11i will install JDK version on your machine otherwise you will get errors I don’t want to discuss all this here. Just NOOOO JDK on your machine.

Pre-requisite software requirements.
1. Microsoft VC++ - http://msdn.microsoft.com/vstudio/express/visualc/download/

while installing VC++ make sure it is done in C:\V98. No spaces in any directory
structure of any software you install as pre-requisite for Oracle Apps. Opt for Register
Environment Variables while installing VC++.

If you installed MS Visual Studio C++ 6.0 then make sure you installed service pack 6.

http://msdn2.microsoft.com/en-us/vstudio/aa718364.aspx

Copy LINK.exe from C:\V98\bin to C:\WINDOWS\System32

2. Perl - http://www.activestate.com/Products/ActivePerl/

Version 5.8 or more and use MSI package type.

Perl is only needed if you are using Oracle Media Pack. If you are downloading from oracle site then you can skip this installation.

2. CYGWIN - http://cygwin.com/

- Download setup.exe to your machine.
Run setup.exe and click Next, which will bring up the Choose Installation Type screen.
Select -> Install from Internet and Click Next
Select -> Root Directory C:\cygwin and select radio button
Install for -> All Users and Default Text File Type -> DOS / text -> Next Local Package Directory can be any but C:\cygwin is recommended. -> Next Direct Connection.

Click on Next again to get to the Select Packages screen, and select the following packages (click on to toggle):
a. All Default
b. Archive Default, plus manually select the zip package
c. Base Default, plus manually select the following extra packages: ash, coreutils,
diffutils, findutils, gawk, grep, sed, tar and which
d. Devel Default, plus manually select binutils, gcc, gcc-core, gcc-g++, make and
mktemp
e. Doc Default, plus manually select cygwin-doc and man
f. Editors Default, plus manually select vim
g. Interpreters Default, plus manually select gawk
h. Shells Default, plus manually select ash and tcsh
i. Utils Default, plus manually select cygutils and file

Click on Next again to download the selected files. It will take some time depending upon mirror site you selected and after download cygwin setup will be automatically starts.

After installation completed

Open folder C:\cygwin\bin

And rename followings

gawk.exe to awk.exe
grep.exe to egrep.exe
make.exe to gnumake.exe
gcc.exe to cc.exe

You can override the name if system says that awk or egrep or cc already exits just remove or move to some other place.

Set the Path to include the C:\cygwin\bin

C:\> set PATH = %PATH%;c:\cygwin\bin

And then check your PATH to see that it include C:\cygwin\bin and C:\V98\bin

C:\>echo %PATH%

Oracle Media
You should be having Lasted available Oracle media pack (recommended) or Software download from oracle site and follow the unzipping instruction as per oracle documentation.

Domain Name Configuration

1. Open file c:\windows\system32\drivers\etc\hosts. Enter a domain next to localhost entry you will be using this domain while installing Oracle Applications. I used mydomain so you can replace what ever you want. 198.168.1.102 is IP Address of my PC you should enter your machine’s IP. If you don’t know it you can find it.

C:\>ipconfig

Example

127.0.0.1 localhost mydomain mydomain.com
198.168.1.102 mydomain mydomain.com

2. Go to Control Panel -> Systems -> Computer Name Tab -> Click on Change -> Click on More -> Enter Primary DNS Suffix as ‘mydomain’.

3. Open Network connections, Select your Connection on which your machine is connected (You will find Wireless or LAN) and right click and select properties. Select Internet Protocol( TCP/IP) and click on to properties. Click on Advanced button and go to DNS tab. Enter DNS suffix for this connection as ‘mydomain’.

4. Restart the PC.

.Staging the Oracle

If you have Oracle Media Pack then

Insert the Start Here DVD in DVD Rom and go to folder

Stage11i\startCD\Disk1\rapidwiz in DOS Prompt and type

D:\Stage11i\startCD\Disk1\rapidwiz\perl adautostg.pl
And follow the wizard.

Recommended Steps but not necessary.

There steps are only if your installation fails due to any reason so you can restore your registry and system to pre installation state.

When Staging is done successfully then export the registry and save it on a file.
Start -> Run -> regedit-> File -> Export and select the location where you want to store it .

Take a Computer Restore Point.
Start -> All Programs -> Accessories -> System Tools -> System Restore ->Create a Restore Point -> Enter name of restore point for example ‘PreOra’ and Press the Create.

Restart the PC.

Installing the the EBS 11i

So far you have done a great job. Now time to get the job done.

Go to folder C:\Stage11i\startCD\Disk1\rapidwiz or where you have done your staging on hard drive and just click RapidWiz

On welcome screen -> Next and Select

Install Oracle Applications E-Bussiness 11i Check on Use Express Configuration -> Next

In Express Configuration Information screen enter the following:

Database Type = Vision Demo Database
Database SID = VIS
MKS directory = C:\cygwin\bin or where “cygwin\bin” is
MSDEV directory = C:\V98 or where VC++ was installed
Domain = mydomain or what so ever is your domain.
Oracle Base directory =C:\oracle or where ever you want to install oracle
applications

Follow the wizard and you should pass all the Pre-Install Checks
If not then you did not follow instructions above and help yourself.

If you passed all the checks then just Click Next and follow the Wizard and installation will be done in 5 steps and take about 2-3 hrs depends upon the system.

After the installation is completed successfully (it should be) then Post-Installation Checks will be preformed. If you passed all the checks It is really a Wonderful and You Rocks

If your system don’t pass the Post-Installation Checks even then don’t worry just smile coz installation is successful you need to restart your PC and Open Command Prompt open to staging directory c:\Stage11i\startCD\Disk1\rapidwiz
And now just type rapidwiz –restart

Follow the Wizard and Enter all the info as you enter before Now This time it will take few minutes and you should pass Post-Installation Checks

If still a problem just repeat above step again you will get to it . Restart the PC and enter the URL in web browser

http://hostname.mydomain:8000/

E-Bussiness Login Username = sysadmin Password = sysadmin

These are the successful installation steps. I practically have done all that. Thanks to Mr. Naveed

Cheers …..

Wednesday, January 2, 2008

Create Oracle FND_USER with System Administrator

If you have the Apps Password, its quite easy to create a FND_USER for yourself by using the API.
I find this script very useful when development environment gets cloned from Production(that is when i do not have FND_USER in Production.
Please note that:-
1. You will be allocated System Administrator by this script. Hence you can assign whatever responsibilities that you desire latter, after logging in.
2. The password will be set to oracle
3. You need apps password to run this script. Alternately you need execute permission on fnd_user_pkg from the user where this script will be run. If using some other user, please use apps.fnd_user_pkg.createuser
4. You need to do a COMMIT after this script has run. I have not included the commit within this script.
5. When running this script, you will be prompted to enter a user name.

--------Beging of script--------------
DECLARE
--By: Anil Passi
--When Jun-2001
v_session_id INTEGER := userenv('sessionid');
v_user_name VARCHAR2(30) := upper('&Enter_User_Name');
BEGIN
--Note, can be executed only when you have apps password.
-- Call the procedure to Creaet FND User
fnd_user_pkg.createuser(x_user_name => v_user_name
,x_owner => ''
,x_unencrypted_password => 'oracle'
,x_session_number => v_session_id
,x_start_date => SYSDATE - 10
,x_end_date => SYSDATE + 100
,x_last_logon_date => SYSDATE - 10
,x_description => 'appstechnical.blogspot.com'
,x_password_date => SYSDATE - 10
,x_password_accesses_left => 10000
,x_password_lifespan_accesses => 10000
,x_password_lifespan_days => 10000
,x_employee_id => 30 /*Change this id by running below SQL*/
/*
SELECT person_id
,full_name
FROM per_all_people_f
WHERE upper(full_name) LIKE '%' || upper('full_name') || '%'
GROUP BY person_id
,full_name
*/
,x_email_address => 'appstechnical.blogspot@gmail.com'
,x_fax => ''
,x_customer_id => ''
,x_supplier_id => '');
fnd_user_pkg.addresp(username => v_user_name
,resp_app => 'SYSADMIN'
,resp_key => 'SYSTEM_ADMINISTRATOR'
,security_group => 'STANDARD'
,description => 'Auto Assignment'
,start_date => SYSDATE - 10
,end_date => SYSDATE + 1000);
END;
/

Read Only Schema in Oracle APPS 11i

In this article I have discussed how to create and maintain a read only schema for APPS in Oracle eBusiness Suite. Whilst in the past I have known clients to implement this using synonyms. However the approach discussed below is designed without the need of having to create a single synonym in APPS_QUERYschema.

Step 1
Create the read-only schema, in this case lets call it APPS_QUERY.

Step 2.
Surely, the schema created in above Step 1 will be given read only grants to objects in apps. There will be cases where the grant command might fail. To monitor such failures create a table as below
conn xx_g4g/&2 ;
--For APPS_QUERY. This table will capture the exceptions during Grants
PROMPT create table XX_GRANTS_FAIL_APPS_QUERY
create table XX_GRANTS_FAIL_APPS_QUERY (
object_name VARCHAR2(100)
,sqlerrm varchar2(2000)
,creation_date DATE
);


grant all on XX_GRANTS_FAIL_APPS_QUERY to apps with grant option;

grant select on XX_GRANTS_FAIL_APPS_QUERY to apps_query ;

Step 3
In this step we grant select on all the existing views and synonyms in apps schema to apps_query.

conn apps/&1 ;

PROMPT This can take upto 15-30 minutes
PROMPT Granting SELECT on All synonyms and views to apps_query
DECLARE
--One off script to execute grants to apps_query
v_error VARCHAR2(2000);
BEGIN

FOR p_rec IN (SELECT *
FROM all_objects
WHERE owner = 'APPS'
AND object_type IN ('SYNONYM', 'VIEW')
AND object_name NOT LIKE '%_S')
LOOP
BEGIN
EXECUTE IMMEDIATE 'grant select on ' || p_rec.object_name ||
' to apps_query';
EXCEPTION
WHEN OTHERS THEN
v_error := substr(SQLERRM, 1, 2000);
INSERT INTO bes.XX_GRANTS_FAIL_apps_query
(object_name
,SQLERRM
,creation_date
)
VALUES
(p_rec.object_name
,v_error
,sysdate
);
END;
END LOOP;
COMMIT;
END;
/


Step 4
Write a after logon trigger on apps_query schema. The main purpose of this trigger is to alter the session to apps schema, such that the CurrentSchema will be set to apps for the session(whilst retaining apps_query restrictions).In doing so your logon will retain the permissions of apps_query schema(read_only). Howerver it will be able to reference the apps objects with exactly the same name as does a direct connection to apps schema.


conn apps/&1 ;
PROMPT CREATE OR REPLACE TRIGGER xx_apps_query_logon_trg
CREATE OR REPLACE TRIGGER xx_apps_query_logon_trg
--16Jun2006 By Anil Passi
--Trigger to toggle schema to apps, but yet retaining apps_query resitrictions
--Also sets the org_id
AFTER logon ON apps_query.SCHEMA
DECLARE
BEGIN
EXECUTE IMMEDIATE
'declare begin ' ||
'dbms_application_info.set_client_info ( 101 ); end;';
EXECUTE IMMEDIATE 'ALTER SESSION SET CURRENT_SCHEMA =APPS';
END;
/


Step 5
Create a Trigger on the apps schema to issue select only grants for all new views and synonyms. Please note that I am excluding grants for sequences. SELECT grants for views and synonyms will be provided to apps_query as and when such objects are created in APPS. Please note that, all the APPS objects (views and synonyms) that existed in APPS schema prior to the implementation of this design, would have been granted read-only access to apps_query in Step 2.

conn apps/&1 ;
PROMPT CREATE OR REPLACE TRIGGER xx_grant_apps_query
CREATE OR REPLACE TRIGGER xx_grant_apps_query
--16Jun2006 By Anil Passi
--
AFTER CREATE ON APPS.SCHEMA
DECLARE
l_str VARCHAR2(255);
l_job NUMBER;
BEGIN
IF (ora_dict_obj_type IN ('SYNONYM', 'VIEW'))
AND (ora_dict_obj_name NOT LIKE '%_S')
THEN
l_str := 'execute immediate "grant select on ' || ora_dict_obj_name ||
' to apps_query";';
dbms_job.submit(l_job, REPLACE(l_str, '"', ''''));
END IF;
END;
/


Some notes for this design

Note1
You need to ensure that the schema created in Step 1 has very limited permissions. Most importantly it must not be given grant for “EXECUTE/CREATE ANY PROCEDURE”. You will need to agree with your DBAs upfront for the permissions,

Note 2
Only views and synonyms will be granted access. Objects in your xx_g4g(bespoke) schema should have their synonyms in apps already in place.

Note 3
If your site has multi org enabled, you will then have to set the org I'd after loggiong on to apps query schema. In case you have only one single ORG_ID, then would have been set as in Step 4 above.

Note 4
ALTER SESSION SET CURRENT_SCHEMA =APPS
This facilitates users to run their queries as if they were connected to apps schema. However, their previliges will be restricted to those of apps_query

Note 5
It is assumed that ALTER SESSION privilege will exist for APPS_QUERY schema.

Oracle FNDLOAD Script Examples

In this article I wish to give real working examples of Oracle's FNDLOAD utility.
Besides that, I have included some useful notes on FNDLOAD utility

I have used FNDLOAD successfully in past for several different entities/data types within Oracle 11i for almost all my previous clients, ever since this utility became available.
Some of the examples in this FNDLOAD article include:-
FNDLOAD to transfer Request Groups
FNDLOAD for moving Concurrent Programs
FNDLOAD to download and upload Forms Personalizations ( or Personalisations depending on where you are located )

To FNDLOAD Web ADI, visit the link Web ADI FNDLOAD

Use FNDLOAD for transferring value set definitions.
-->Please note that when transferring Key Flex Fields and Descriptive flex fields the respective value sets against each segment will be extracted and loaded automatically.

Also, FNDLOAD can be used to migrate Key FlexFields, Descriptive Flexfields, Responsibilities and almost every other FND entity.

Please note that the text written down here could get wrapped in the browser.
Hence you may have to use \ to continue the single line command on Unix, in case you find the lines wrapping
In my case I am ensuring that $CLIENT_APPS_PWD has the apps password before running the scripts


------------------------------------------------------------------------------------------


##To FNDLOAD Request groups
FNDLOAD apps/$CLIENT_APPS_PWD O Y DOWNLOAD $FND_TOP/patch/115/import/afcpreqg.lct XX_MY_REPORT_GROUP_NAME.ldt REQUEST_GROUP REQUEST_GROUP_NAME="XX_MY_REPORT_GROUP_NAME" APPLICATION_SHORT_NAME="XXGMS"
##Note that
##---------
## <> will be your Application Shortname where request group is registered
## XX_MY_REPORT_GROUP_NAME
Will be the name of your request group
## ##To upload this Request Group in other environment after having transferred the ldt file

FNDLOAD apps/$CLIENT_APPS_PWD O Y UPLOAD $FND_TOP/patch/115/import/afcpreqg.lct


------------------------------------------------------------------------------------------


##To FNDLOAD Concurrent Programs
FNDLOAD apps/$CLIENT_APPS_PWD O Y DOWNLOAD $FND_TOP/patch/115/import/afcpprog.lct XX_CUSTOM_ORACLE_INTERFACE_PROG.ldt PROGRAM APPLICATION_SHORT_NAME="XXGMS" CONCURRENT_PROGRAM_NAME="XX_CUSTOM_ORACLE_INTERFACE_PROG"
##Note that
##---------
## XXGMS will be your custom GMS Application Shortname where concurrent program is registered
## XX_CUSTOM_ORACLE_INTERFACE_PROG
Will be the name of your request group
## XX_CUSTOM_ORACLE_INTERFACE_PROG.ldt is the file where concurrent program definition will be extracted
## ##To upload
FNDLOAD apps/$CLIENT_APPS_PWD O Y UPLOAD $FND_TOP/patch/115/import/afcpprog.lct XX_CUSTOM_ORACLE_INTERFACE_PROG.ldt


------------------------------------------------------------------------------------------


##To FNDLOAD Oracle Descriptive Flexfields
$FND_TOP/bin/FNDLOAD apps/$CLIENT_APPS_PWD 0 Y DOWNLOAD $FND_TOP/patch/115/import/afffload.lct XX_PO_REQ_HEADERS_DFF.ldt DESC_FLEX APPLICATION_SHORT_NAME=PO DESCRIPTIVE_FLEXFIELD_NAME='PO_REQUISITION_HEADERS'
##Note that
##---------
## PO is the Application Shortname against which descriptive flexfield against PO Headers is registered
## PO_REQUISITION_HEADERS
is the name of Descriptive Flexfield against PO Requisition Headers
## Use the SQL below to find the name of DFF, rather than logging into the screen (ooops via jinitiator)
########----->SELECT
########----->application_id, DESCRIPTIVE_FLEXFIELD_NAME, application_table_name
########----->FROM
########-----> fnd_descriptive_flexs_vl
########----->WHERE
########-----> APPLICATION_TABLE_NAME like '%' || upper('&tab_name') || '%'
########----->ORDER BY APPLICATION_TABLE_NAME
########----->/
## To upload into another environment
$FND_TOP/bin/FNDLOAD apps/$CLIENT_APPS_PWD 0 Y UPLOAD $FND_TOP/patch/115/import/afffload.lct XX_PO_REQ_HEADERS_DFF.ldt

## OK another example for DFF against FND_LOOKUPS
FNDLOAD apps/$CLIENT_APPS_PWD 0 Y DOWNLOAD $FND_TOP/patch/115/import/afffload.lct XX_FND_COMMON_LOOKUPS_DFF.ldt DESC_FLEX APPLICATION_SHORT_NAME=FND DESCRIPTIVE_FLEXFIELD_NAME='FND_COMMON_LOOKUPS'
## OK another example for DFF against Project Accounting Expenditure Types
FNDLOAD apps/$CLIENT_APPS_PWD 0 Y DOWNLOAD $FND_TOP/patch/115/import/afffload.lct XX_PA_EXPENDITURE_TYPES_DESC_FLEX_DFF.ldt DESC_FLEX APPLICATION_SHORT_NAME=PA DESCRIPTIVE_FLEXFIELD_NAME='PA_EXPENDITURE_TYPES_DESC_FLEX'


------------------------------------------------------------------------------------------


##To FNDLOAD Oracle Menus
$FND_TOP/bin/FNDLOAD apps/$CLIENT_APPS_PWD O Y DOWNLOAD $FND_TOP/patch/115/import/afsload.lct ICX_POR_SSP_HOME.ldt MENU MENU_NAME="ICX_POR_SSP_HOME"
##Note that
##---------
## Oracle Menus are not attached to applications. Hence no need to include application short name
## ICX_POR_SSP_HOME is the menu name. This can be validated via below SQL
## select user_menu_name from fnd_menus_vl where menu_name = 'ICX_POR_SSP_HOME' ;
## Also note that we do not pass in the User_menu_name in this example
## OK, now to upload this file
$FND_TOP/bin/FNDLOAD apps/$CLIENT_APPS_PWD O Y UPLOAD $FND_TOP/patch/115/import/afsload.lct ICX_POR_SSP_HOME.ldt


----------------------------------------------------------------------------------------------------------------------------

## Well, now for FND Messages to download a single message
FNDLOAD apps/$CLIENT_APPS_PWD 0 Y DOWNLOAD $FND_TOP/patch/115/import/afmdmsg.lct \
XX_ICX_POR_LIFECYCLE_PAY_TIP.ldt FND_NEW_MESSAGES APPLICATION_SHORT_NAME='ICX' MESSAGE_NAME=XX_ICX_POR_LIFECYCLE_PAY_TIP

## Or you may as well download all the messages within an application
FNDLOAD apps/$CLIENT_APPS_PWD 0 Y DOWNLOAD $FND_TOP/patch/115/import/afmdmsg.lct \
XX_ALL_GMS_MESSAGES_00.ldt FND_NEW_MESSAGES APPLICATION_SHORT_NAME='XXGMS'

## now to upload using FNDLOAD
FNDLOAD apps/$CLIENT_APPS_PWD 0 Y UPLOAD $FND_TOP/patch/115/import/afmdmsg.lct XX_ICX_POR_LIFECYCLE_PAY_TIP.ldt


----------------------------------------------------------------------------------------------------------------------------


## Now it's the turn of Lookup values. Again, its not a rocket science
FNDLOAD apps/$CLIENT_APPS_PWD 0 Y DOWNLOAD aflvmlu.lct XX_TRX_BATCH_STATUS.ldt FND_LOOKUP_TYPE APPLICATION_SHORT_NAME ='XXGMS' LOOKUP_TYPE="XX_TRX_BATCH_STATUS"
## Note that
## XX_TRX_BATCH_STATUS is the name of FND Lookup Type in this example
## This will download all the lookup codes within the defined lookup
## To upload
FNDLOAD apps/$CLIENT_APPS_PWD 0 Y UPLOAD aflvmlu.lct XX_TRX_BATCH_STATUS.ldt

----------------------------------------------------------------------------------------------------------------------------

## You can also move the User definitions from FND_USER
FNDLOAD apps/$CLIENT_APPS_PWD 0 Y DOWNLOAD $FND_TOP/patch/115/import/afscursp.lct ./XX_FND_USER_PASSI.ldt FND_USER USER_NAME='ANILPASSI'
#Do not worry about your password being extracted, it will be encrypted as below in ldt file
#BEGIN FND_USER "ANILPASSI"
# OWNER = "PASSIA"
# LAST_UPDATE_DATE = "2005/10/19"
# ENCRYPTED_USER_PASSWORD = "ZGE45A8A9BE5CF4339596C625B99CAEDF136C34FEA244DC7A"
# SESSION_NUMBER = "0"
To upload the FND_USER using FNDLOAD command use
FNDLOAD apps/$CLIENT_APPS_PWD 0 Y UPLOAD $FND_TOP/patch/115/import/afscursp.lct ./XX_FND_USER_PASSI.ldt
Notes for using FNDLOAD against FND_USER:-
1. After uploading using FNDLOAD, user will be promoted to change their password again during their next signon attempt.
2. All the responsibilities will be extracted by FNDLOAD alongwith User Definition in FND_USER
3. In the Target Environment , make sure that you have done FNDLOAD for new responsibilities prior to running FNDLOAD on users.

----------------------------------------------------------------------------------------------------------------------------


## Now lets have a look at the profile option using oracle's FNDLOAD
FNDLOAD apps/$CLIENT_APPS_PWD O Y DOWNLOAD $FND_TOP/patch/115/import/afscprof.lct POR_ENABLE_REQ_HEADER_CUST.ldt PROFILE PROFILE_NAME="POR_ENABLE_REQ_HEADER_CUST" APPLICATION_SHORT_NAME="ICX"
## Note that
## POR_ENABLE_REQ_HEADER_CUST is the short name of profile option
## We aren't passing the user profile option name in this case. Validate using ...
########----->select application_id, PROFILE_OPTION_NAME || '==>' || profile_option_id || '==>' ||
########----->USER_PROFILE_OPTION_NAME
########----->from FND_PROFILE_OPTIONS_VL
########----->where PROFILE_OPTION_NAME like '%' || upper('&profile_option_name') || '%'
########----->order by PROFILE_OPTION_NAME
########----->/
## Now to upload
FNDLOAD apps/$CLIENT_APPS_PWD O Y UPLOAD $FND_TOP/patch/115/import/afscprof.lct POR_ENABLE_REQ_HEADER_CUST.ldt


----------------------------------------------------------------------------------------------------------------------------


## Now for the request sets that contain the stages and links for underlying concurrent programs
## For this you will be firstly required to download the request set definition.
## Next you will be required to download the Sets Linkage definition
## Well, lets be clear here, the above sequence is more important while uploading
FNDLOAD apps/$CLIENT_APPS_PWD 0 Y DOWNLOAD $FND_TOP/patch/115/import/afcprset.lct XX_GL_MY_INTERFACE_SET.ldt REQ_SET REQUEST_SET_NAME="FNDRSSUB4610101_Will_look_like_this"
FNDLOAD apps/$CLIENT_APPS_PWD 0 Y DOWNLOAD $FND_TOP/patch/115/import/afcprset.lct XX_GL_MY_INTERFACE_SET_LINK.ldt REQ_SET_LINKS REQUEST_SET_NAME="FNDRSSUB4610101_Will_look_like_this"
## Note that FNDRSSUB4610101 can be found by doing an examine on the
########----->select request_set_name from fnd_request_sets_vl
########----->where user_request_set_name = 'User visible name for the request set here'
## Now for uploading the request set, execute the below commands
FNDLOAD apps/$CLIENT_APPS_PWD 0 Y UPLOAD $FND_TOP/patch/115/import/afcprset.lct XX_GL_MY_INTERFACE_SET.ldt
FNDLOAD apps/$CLIENT_APPS_PWD 0 Y UPLOAD $FND_TOP/patch/115/import/afcprset.lct XX_GL_MY_INTERFACE_SET_LINK.ldt


----------------------------------------------------------------------------------------------------------------------------


## Now for the responsibility
FNDLOAD apps/$CLIENT_APPS_PWD O Y DOWNLOAD $FND_TOP/patch/115/import/afscursp.lct XX_PERSON_RESPY.ldt FND_RESPONSIBILITY RESP_KEY="XX_PERSON_RESPY"
## note that XX_PERSON_RESPY is the responsibility key
## Now to upload
FNDLOAD apps/$CLIENT_APPS_PWD O Y UPLOAD $FND_TOP/patch/115/import/afscursp.lct XX_PERSON_RESPY.ldt


----------------------------------------------------------------------------------------------------------------------------
## OK, now for the forms personalizations
## For the forms personalizations, I have given three examples as below.
FNDLOAD apps/$CLIENT_APPS_PWD 0 Y DOWNLOAD $FND_TOP/patch/115/import/affrmcus.lct XX_PERWSHRG.ldt FND_FORM_CUSTOM_RULES function_name="PERWSHRG-404"
FNDLOAD apps/$CLIENT_APPS_PWD 0 Y DOWNLOAD $FND_TOP/patch/115/import/affrmcus.lct XX_HZ_ARXCUDCI_STD.ldt FND_FORM_CUSTOM_RULES function_name="HZ_ARXCUDCI_STD"
FNDLOAD apps/$CLIENT_APPS_PWD 0 Y DOWNLOAD $FND_TOP/patch/115/import/affrmcus.lct XX_AP_APXVDMVD.ldt FND_FORM_CUSTOM_RULES function_name="AP_APXVDMVD"
## Note that the function name above is the function short name as seen in the Function Definition Screen
## Now to upload the forms personalizations that are defined against these forms functions....
FNDLOAD apps/$CLIENT_APPS_PWD 0 Y UPLOAD $FND_TOP/patch/115/import/affrmcus.lct XX_PERWSHRG.ldt
FNDLOAD apps/$CLIENT_APPS_PWD 0 Y UPLOAD $FND_TOP/patch/115/import/affrmcus.lct XX_HZ_ARXCUDCI_STD.ldt
FNDLOAD apps/$CLIENT_APPS_PWD 0 Y UPLOAD $FND_TOP/patch/115/import/affrmcus.lct XX_AP_APXVDMVD.ldt


----------------------------------------------------------------------------------------------------------------------------


Notes :
1. Give special attention when downloading Menus or Responsibilities.
In case your client has several developers modifying Responsibilities and Menus, then be ultra carefull. Not being carefull will mean that untested Forms and Functions will become available in your clients Production environment besides your tested forms, functions and menus.

2. Be very careful when downloading flexfields that reference value sets with independent values for GL Segment Codes.
By doing so, you will download and extract all the test data in GL Codes that might not be applicable for production.

3. There are several variations possible for FNDLOAD, for example you can restrict the download and uploads to specific segments within Descriptive Flex Fields. Please amend the above examples as desired for applying appropriate filterations.

4. The list of examples by no mean cover all possible FNDLOAD entities.

5. FNDLOAD is very reliable and stable, if used properly. This happens to by one of my favourite Oracle utilities.

4. Last but not the least, please test your FNDLOAD properly, so as to ensure that you do not get any unexpected data. In past I have noticed undesired results when the Lookup gets modified manually directly on production, and then the FNDLOAD is run for similar changes. If possible, try to follow a good practice of modifying FNDLOADable data only by FNDLOAD on production environment.

5. As the name suggests, FNDLOAD is useful for FND Related objects. However in any implementation, you will be required to migrate the Setups in Financials and Oracle HRMS from one environment to another. For this you can use iSetup. "Oracle iSetup".
Some of the things that can be migrated using Oracle iSetup are
GL Set of Books, HR Organization Structures, HRMS Employees, Profile Options Setup, Suppliers, Customers, Tax Codes
& Tax Rates, Financials Setup, Accounting Calendars, Chart of Accounts, GL Currencies.

Playing with CUSTOM.pll

lease find some commands for CUSTOM.pll

To convert from CUSTOM.pll to CUSTOM.pld
f60gen module_type=LIBRARY module=CUSTOM script=YES userid=apps/apps

To convert back from CUSTOM.pld to CUSTOM.pll ( after having edited the text pld file )
f60gen module_type=LIBRARY module=CUSTOM parse=YES userid=apps/apps

To convert from CUSTOM.pll to CUSTOM.plx
f60gen module_type=LIBRARY module=CUSTOM userid=apps/apps

SSHR Rollout Create FND_USER and Allocate Responsibilities

Every organization that rolls out any Oracle Self Service Application requires a methodology to allocate responsibilities and to create Users.
The pseudo code example taken here has following requirements:-
1. Create a concurrent program, passing to parameter for one Cost Centre/Group or all Cost Centres.
This way, Self Service can be rolled out in Phased manner.
2. Besides a parameter for the cost centre, there will be another parameter to run the process in a Read-Only mode.
3. There are two possibilities for the Employees which are eligible(given their cost centre).
Possibility a. The employee already has an existing FND_USER record
Possibility b. The employee does not have an existing FND_USER record.

Solution for Possibility a.
Identify the FND_USER record, using the fnd_user.employee_id = per_all_people_f.person_id
Use fnd_user_resp_groups_api.insert_assignment to add new Self Service responsibility to that User.
Send the user an Email giving them details of the responsibility that has been added.

Solution for Possibility b.
Create an FND_USER record, using the fnd_user_pkg, attaching this to Person Id.
Use fnd_user_resp_groups_api.insert_assignment to add new Self Service responsibility to that User.
Send them an email to inform the User-Id and Password along with instructions to log on & use the application.


Questions & Answers
How do I create a 8 digit password for FND_USER record?
FUNCTION get_random_password RETURN VARCHAR2 IS
BEGIN
RETURN lower(dbms_random.STRING('X',8));
END get_random_password;

We want users to be enforced to alter their password every 6months, how to ?
Use parameter x_password_lifespan_days
fnd_user_pkg.createuser
(
x_user_name => p_user_name
,x_owner => ''
,x_unencrypted_password => v_password
,x_description => p_person_description
,x_password_lifespan_days => 180
,x_employee_id => p_person_id
,x_email_address => p_email_address
);


The random password that is generated might have repeating characters, which will error if Profile "Signon Password Hard To Guess" is Set to Yes?
You can temporarily set the profile to N in the session during which concurrent program runs.
fnd_profile.put(NAME => 'SIGNON_PASSWORD_HARD_TO_GUESS' ,val => 'N');


Should I use Workflow to inform users?
You might as well use SMTP. Be careful that on Dev environment business users do not receive Emails.
This can be ensured by checking return of select instance_name from v$instance to be PRD Database.
You can use procedure send_html_email in the Code Sample in link provided in the article.


Can I run the source code as is?
The source code provided is for allocating a responsibility named "XX HR Employee Self Service".I have removed all the client specific bits from the code. Hence you will need to alter to make this to be of any use. The idea is to merely provide you a guideline for API Usage.

Validate Email PL/SQL

Oracle delivers an API in EBS that can validate Email Address Format.
However it does not capture the invalidity if Email String were to be say xxx@host
You may use the below pl/sql function for Email Address Validation.


CREATE OR REPLACE FUNCTION xx_check_email(l_user_name IN VARCHAR2)
RETURN VARCHAR2 IS
l_dot_pos NUMBER;
l_at_pos NUMBER;
l_str_length NUMBER;
BEGIN
l_dot_pos := instr(l_user_name
,'.');
l_at_pos := instr(l_user_name
,'@');
l_str_length := length(l_user_name);
IF ((l_dot_pos = 0) OR (l_at_pos = 0) OR (l_dot_pos = l_at_pos + 1) OR
(l_at_pos = 1) OR (l_at_pos = l_str_length) OR
(l_dot_pos = l_str_length))
THEN
RETURN 'FAILURE';
END IF;
IF instr(substr(l_user_name
,l_at_pos)
,'.') = 0
THEN
RETURN 'FAILURE';
END IF;
RETURN 'SUCCESS';
END xx_check_email;

Which FND_USER is locking that table

This is a quick note to share a SQL that will tell you the FND_USER.USER_NAME of the person that has locked a given table in Oracle APPS.

The column named "module" will tell you the name of the Form Function or the Concurrent Program Short name which has aquired a lock onto that table.


SELECT c.owner
,c.object_name
,c.object_type
,fu.user_name locking_fnd_user_name
,fl.start_time locking_fnd_user_login_time
,vs.module
,vs.machine
,vs.osuser
,vlocked.oracle_username
,vs.sid
,vp.pid
,vp.spid AS os_process
,vs.serial#
,vs.status
,vs.saddr
,vs.audsid
,vs.process
FROM fnd_logins fl
,fnd_user fu
,v$locked_object vlocked
,v$process vp
,v$session vs
,dba_objects c
WHERE vs.sid = vlocked.session_id
AND vlocked.object_id = c.object_id
AND vs.paddr = vp.addr
AND vp.spid = fl.process_spid(+)
AND vp.pid = fl.pid(+)
AND fl.user_id = fu.user_id(+)
AND c.object_name LIKE '%' || upper('&tab_name_leaveblank4all') || '%'
AND nvl(vs.status
,'XX') != 'KILLED';

OA Framework Tutorial 01 Script

Please find below the script for the First Audio Video Tutorial in OA Framework

create table xx_person_details
(
PERSON_ID NUMBER NOT NULL
,FIRST_NAME VARCHAR2(50)
,LAST_NAME VARCHAR2(50)
,EMAIL VARCHAR2(100)
,student_flag VARCHAR2(1)
,name_of_university VARCHAR2(100)
,last_update_date DATE
,last_update_login INTEGER
,last_updated_by INTEGER
,creation_date DATE
,created_by INTEGER
) ;


CREATE OR REPLACE PROCEDURE xx_insert_person_prc(p_person_rec IN OUT xx_person_details%ROWTYPE) IS
BEGIN
SELECT per_people_s.NEXTVAL
INTO p_person_rec.person_id
FROM dual;
p_person_rec.last_update_date := SYSDATE;
p_person_rec.creation_date := SYSDATE;
p_person_rec.last_update_login := -1;
p_person_rec.last_updated_by := 71690;
p_person_rec.created_by := 71690;
INSERT INTO xx_person_details
VALUES p_person_rec;
END xx_insert_person_prc;
/


DECLARE
l_person_rec xx_person_details%ROWTYPE;
BEGIN
l_person_rec.first_name := 'Anil';
l_person_rec.last_name := 'Passi';
l_person_rec.email := 'passi.anil@gmail.com';
l_person_rec.student_flag := 'N';
xx_insert_person_prc(l_person_rec);
l_person_rec.first_name := 'Tom';
l_person_rec.last_name := 'Kumar';
l_person_rec.email := 'tom.kumar@gmail.com';
xx_insert_person_prc(l_person_rec);
l_person_rec.first_name := 'Mark';
l_person_rec.last_name := 'Kapoor';
l_person_rec.email := 'tom.kumar@gmail.com';
xx_insert_person_prc(l_person_rec);
commit;
END;
/

SELECT count(*)
FROM xx_person_details ;


commit;

Calling a PL/SQL Concurrent Program in Real-Time

Lets say there is an Oracle Delivered concurrent program of type PL/SQL.

Your requirement is such that you wish to call that PL/SQL Executable [attached to concurrent program] directly from some other process, in real-time mode, in the same session as that of the parent Oracle session[forms or report or some other plsql ]. In order to call that pl/sql program within the same session, your challenge may be that the concurrent program could be writing into log/output file using fnd_file API which you want to display to the user somehow.
To get a handle to the log/output of the API [which is executable of Conc Program], we need to do the following:-
1. Call fnd_global.initialize ensuring you pass it two parameters in bold below
declare
...your variables here
v_session_id INTEGER := userenv('sessionid');
v_trace VARCHAR2(2000) := fnd_trace.get_trace_filename;
n_conc_request_id INTEGER ;
begin
//optionally trace the API Call with bind variable values
execute immediate 'alter session set events=''10046 trace name context forever, level 12''' ;
//the trace file details will be in
variable v_trace

//Now call fnd_global.initialize ensuring you pass it two parameters in bold below

fnd_global.initialize
(
session_id => v_session_id
,user_id => 18594 //or pass the current fnd_global.user_id itself
,resp_id => 4650126 //or pass the current fnd_global.resp_id itself
,resp_appl_id => 8405 //or pass the current fnd_global.resp_appl_id itself
,security_group_id => 0
,site_id => NULL
,login_id => 3115003
,conc_login_id => NULL
,prog_appl_id => NULL
,conc_program_id => 229233 //The program id of concurrent request
,conc_request_id => n_conc_request_id //From fnd_concurrent_requests_s.nextval
,conc_priority_request => NULL
);
//Lets assume the nextval from sequence is 14633154
//now call the API, i have arbitrarily typed in just any API
ar_process_trx.place_hold( v_errbuf, v_retcode, v_trx_id ) ;
end ;

2. Run the SQL on fnd_temp_files, as below, using the fictional request_id generated from sequence [ in variable n_conc_request_id ]


3. In order to read those files, ensure that the directory [/usr/tmp in this case] is listed in v$parameter utl_file_dir


In this approach, no change is made to the Original concurrent program. Hence, if need be, users can continue to run the concurrent process as usual from SRS.


Trace file with bind variables
This approach also makes it easy to trace a concurrent program with bind variables. The location of the trace will can be determined by using API fnd_trace.get_trace_filename. The beauty of this API construct is that it takes care of different platforms like Linux, NT, HP,AIX etc , when constructing the name and full path of the trace file for Concurrent Program

What’s Different TOP’s in Application 11i

If you want to learn apps dba or want training in apps dba and going through this documentation you might be confused to see again & again that everybody is talking about & its quite difficult to unserstand any topic without knowing what the hell is different tops like APPL_TOP , COMMON_TOP or what eaxctly is TOP ?
For me TOP is nothing but top level directory & preceded by related software . So TOP is top level directory in file system or oracle 11i software .
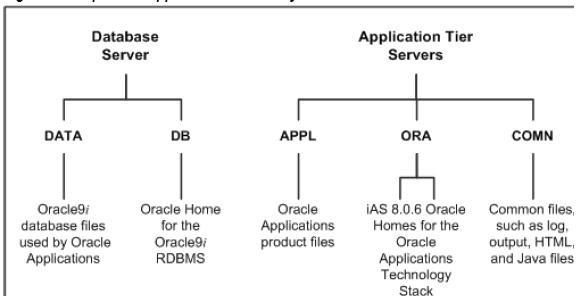
If you have done 11i or oracle application Installation by now ( if not please go though my training for apps dba in my previous posts) Oracle Installer Installs Apps 11i in DB Tier & Application Tier : so lets take Application Tier you will see three directories under your base Installation directory, these diretories are APPL, ORA & COMN (Check pic. at left top of this page) so directory APPL is called as APPL_TOP i.e. top appl directory where files & directories related to different Application ( like GL General Ledger, PO Purchase Order..) exists. If You are DBA you can correlate it with your Oracle database software installation (I know after reading this example you will say its weird but believe me thats how understood it initially , ORACLE_HOME can be called as ORA_TOP , network directory you can say TNS_TOP )
Under ( ORA_TOP ) you will see diretcory related to oracle home , there are two oracle HOME’s in Application Tier 8.0.6 for Forms & Reports , iAS for 9iAS acting as web server)
COMN_TOP will contain files & directories which will be used commonly by all components ( Isn’t this simple to understand )
similarly
IAS_TOP is top files/directory under ORA_TOP/iAS I hope it might be clear to you now if not donot worry it will be more clear once you start working as Apps DBA.
I am attaching few screenshot of other mount points ( Courtsey oracle 11i concepts guide , below is location if you want to read .
http://download-uk.oracle.com/
docs/cd/B25516_08/current/
acrobat/11iconcepts.pdf ( Add these three lines before putting in to browser , I have not put it in single line as it breaks my page layout )
So In this guide you will find few more screenshot of different TOP’s , Go through Chapter 2 , Just 13 Pages ( 13 unlucky number for someone but if understand this chapter , it can be very lucky for you in your Apps DBA Career.

So here I conclude my TOP’s Section , Please don’t forget to leave feedback & what you want hear next.

You can find some comanies on right side or top of this page who might be looking for Apps DBA , visit them by clicking & go to Career section to look for Apps DBA opportunity.

1Z0-312 Managing Customized Oracle Application Server Topologies

As promised, I’ll cover one topic per post for Oracle Certified Professional Certification track for Oracle Application Server 10g Administrator. Today’s post cover first topic which is Managing Customized Oracle Application Server Topologies.

New features for customized deployment topology
——————————————————————-
1. Install only IM type and use it with existing MR in different oracle_home or on different machine
2. Install only MR without registering with IM/OID
3. Rack mounted directory server configuration (Multiple IM/OID pointing to same MR)

Role of OPMN in customized topology
—————————————————-
Role of OPMN is extended in OAS 10g
1. It start/stops all components of OAS
2. Scope of OPMN is extended, it can start specified instance or all instance in farm and OAS cluster
3. opmn.xml can be edited as per your need both manually or from iasConsole

Managing ports in customized topology
————————————————-
1. use static ports initialization file to customize port list , staticports.ini during installation (except database listener port)
2. use chgiphost.sh to change hostname or IP address
3. You can change port numbers later depending on your requirement

Various topology for Oracle Application Server
——————————————————————–
Each oracle application server deployment has unique characterstic and vary as per their requirements. Oracle Application server topologies are broadly classified into three categories
1. Development topology
2. Deployment Topology
3. Special topology for HA (High Availability)
4. Enterprise Data center topology

Each of these broad classification has further sub classification based on type of installation, usages…. explained below

1. Development topology used by
—1.1 Java developers (standalone OC4J or J2EE and webcache installation type). This is single computer install with no infrastructure tier install.
You have to install two components
a) J2EE and WebCache
b) Oracle JDeveloper

Key considerations — These two products should be installed in separate oracle_homes. Order of installation of these two products doesn’t matter

—1.2 Portal & wireless developers (Portal and Wireless installation type)
This type of installation needs two components of oracle application server, Infrastructure tier (IM+MR) and Middle Tier.
Key considerations — These two components of OAS, Infra tier and middle tier should be on separate oracle_home and can be on same machine or different machines.Order of install should be first Infrastructure tier and then middle tier. PDK (Portal Development kit) and Wireless SDK (Software development kit) shipped with Portal and wireless type install type is used for development.

—1.3 Forms & reports developers (BI and forms installation type)in this topology, developers use Forms & Report builder to build application and BI & Forms type installation to test their application (forms,report, BI)This will be installed in three oracle_homes (one for infra tier, second for middle tier of type forms & BI and third for Forms & Report developer)Order of installation is First infra tier, then middle tier and then forms & report developer.

—1.4 Integration architect and modelers topology (OAS install with ProcessConnect and infrastructure tier )This type of topology includes J2EE and webcache type installation with Infrastructure tier and third home for OracleAS ProcessConnect. Order of installation is first infra tier , then J2ee and webcache type middle tier installation using infra tier and finally ProcessConnect. This topology type will have two oracle_homes one for Infra tier and second for j2ee & webcache and processConnect (they will share same oracle_home)

2. deployment topology
—2.1 Hosting topology (in model where OAS is hosted environments)
—2.2 department topology (Where each depptt host their application)
—2.3 Data center topology (multiple deptt. share same data center)

3. Development life cycle (Dev to Test to Stage to Production)similarly application moves from developer topology to departmental topology to enterprise data center topology

4. special topology for HA

—4.1 Cold failover cluster (CFC)Here infrastructure is active only on one node at a time and can be activated on another node if existing Infra tier fails, similarly for middle tier.CFC is Supported with Sun Clusters, HP Service Guard and Veritas. Oracle_homes and OAS configuration files are placed on shared file system. It uses virtual hostname and virtual IPs

—4.2 Active failover cluster (AFC)Only difference between AFC and CFC is that in AFC, infrastructure is active at same time in all infra nodes. —3.3 IM replication (This uses database replication or LDAP replication technology )

Thumb rule as per oracle documentation
—————————————————–
1. All development topology to be installed on single machine
2. All deployment topology need at least four machines

1Z0-312 Cloning and Staging Oracle Application Server

This post is in continuation of Oracle 10g Application Server administration (OCP) track 1Z0-312. This post covers second topic of certification track i.e. Cloning and Staging Oracle Application Server .

Cloning process mentioned here are w.r.t. Oracle Application Server 10g and not at all related to Oracle Applications 11i/R12 (Financials/HRMS)

This topic covers following points as per certification track explained under A, B, C…
A) Clone Oracle Application Server installations
=========================================

i) Cloning is process of creating replica of existing installation to differnt location while preserving its configurations.
ii) You can create a clone using command line cloning scripts or OEM 10g Grid control

iii)

You can clone J2EE and Web Cache middle tier which is not connected to Infrastructure,

Similarly in Portal and Wireless only middle tier can be cloned (You can’t clone infrastructure tier) both source and target instances share same infrastructure database (as described in fig)

iv) During cloning source ORACLE_HOME is copied to destination ORACLE_HOME , then a set of scripts is used to update information in key configuration files of oracle application server middle tier (like hostname).

Key points in OAS cloning ?
—————————————
–You can clone middle tier installation of (J2EE & Webcache, Portal & Wireless and BI & Forms)
–You CANNOT clone
—–i)Infrastructure Tier (MR & IM)
—–ii)OAS Integration, BPEL Process Anaytics or BPEL process manager
—–iii) Developer kit and SDK
—–iv) Installation that includes workflow
–Cloned instance must have different name than source instance.
– You can clone MT (Middle Tier) that is member of OracleAS Cluster or Farm but you must remove instance from OracleAS Cluster and Farm before beginning cloning operation.
– Cloning process does not configure Load Balancer Router, If you use one, you have to configure it manually including invalidation port
– If in source webcache instance is member of cache cluster, then target webcahe should be manually added in to cache cluster (or delete other cache cluster member info manually if you don’t wish to target cloned instance as cache cluster)
– If source webcache instance is configured to forward requests to more than one origin server on same host as source web cache instance, then cloning will fail.
Cloning Process in Oracle Application Server
———————————————————-
i) On source instance run prepare_colne.pl (in $OH/clone/bin) (parses files, create archives using DCM, backs up required files, and run wireless clone assistant if wireless is enabled)
ii) Copy ORACLE_HOME to destination location
iii) ON target instance run clone.pl (invokes OUI which repeats all actions done during source instance installation time)
iv) post clone phase , clone.pl also does following post clone steps to make target cloned instance to a working state. These are
—-a) setting new ORACLE_HOME in DCM
—-b) update configuration file
—-c) calls chgiphost command to change hostname and IP address in cloned instance
—-d) If source instance was connected to OID (Portal/BI) then add information about clone in OID
—-e) After cloning start services on target instance on unix you have to run root.sh after cloning (from root)

B) Customize the cloning process
=============================
You can customize various aspects of cloning like specify custom port during cloning or preserve custom settings

i) Customizing ports during cloning
As mentioned above, cloning oracle application server in turn calls Oracle Universal Installer (OUI), Though you don’t see OUI calls; still OUI calls can be customized by configuration file cs.properties in $ORACLE_HOME/clone/ias/config
For example - To configure custom ports (to target instance) during cloning
clone_command_line = oracle.iappserver.iapptop:szl_PortListSelect=”{\”YES\”,
\”/location_of_port_list/portlist.ini\”}”

When you update this line in cs.properties while cloning , OUI will pick staticportlist.ini file and assign ports based on above file to target instance.

ii) Updating custom data
You can update custom data (custom files) that is not updated by default during cloning.
You can change/customize following data in target cloned instance
Change hostname in a file -> Add full path name of file in which hostname needs to be cahnged to
$ORACLE_HOME/chgip/config/hostname.lst
Update occurance of ORACLE_HOME in a file from old value to new OH value -> Use replace tag in fixup_script.xml.tmpl under
$ORACLE_HOME/clone/ias/config
Extract value from file1 and use it to replace value in file2 -> Use alter tag in fixup_script.xml.tmpl under
$ORACLE_HOME/clone/ias/config

C) Use cloning to expand an OracleAS Cluster
==================================
The most common example of cloning Oracle Application Server is expanding a Oracle AS cluster. For example you have a cluster of J2EE and Webcache Middle tier with identical configuration and wish to add another J2EE and webcache node with identical configuration and deployemt. Assume source Oracle Application Server is connected to file based repository and member of farm and OracleAS Cluster following are cloning steps to expand this OracleAS Cluster
i) Remove Source isnatnce from Farm and Cluster (Use dcmctl or iasConsole); dcmctl leaveFarm and dcmctl leaveCluster
ii) Run preclone on source Instance (”perl prepare_clone.pl”)
iii) Copy oracle_home and associated files from source to target instance
iv) Run clone on target instance “perl clone.pl”
v) Add source isntance to Farm & Cluster (”dcmctl joinFarm” & “dcmctl joinCluster”)
vi) Add target instance to Farm & Cluster using same command mentioned above

Few points related to using cloning to expand OracleAS Cluster
–Cloning Oracle AS Clusters, If source cloned instance is member of Cluster/Farm as mentioned in past remove it from cluster add it back to cluster after cloning.
–If source instance (clustered) is connected to file based repository in separate instance (it is not host of file based repository), cloned instance will be member of same farm as source instance
–If source instance (clustered) is connected to file based repository in same instance (it is host of file based repository), cloned instance will be host of new file based repository.

D) Move J2EE applications from a test middle tier to a new production environment.
==========================================
Their are various ways/options (depending on your requirement)
in which you can move J2EE application from Test to Production Instance

i) You already have J2EE and Webcache type test & production inastance–> Use “dcmctl redeployApplication” or iAS console “Deploy EAR File” method.
ii) You already have J2EE and Webcache (without IM) Test Instance but no prod instance –> Use middle tier clone method (mentioned in previous post) or Install J2EE and Webcache type middle tier on production and deploy J2EE application (using dcmctl or iASConsole)
iii) You already have J2EE and WebCache (with IM & MR) Test Instance but no prod instance –> Install Infrasturure tier on prod instance, install J2EE and Webcache type middle tier and deploy J2EE application by method mentioned above in point ii)

E) Move OracleAS Portal metadata from test to production
==========================================


As figure shown here is self explanatory that we have an existing test & prod Oracle AS environment(Portal type) with Portal
Metadata repository on separate database. Now if you wish to move Portal MR from test to production use export/import feature
to move content from test to prod.
Please note here that export/import mentioned here is portal import/export and not database imp/exp (though portal import/export in background with some additional steps uses database exp/imp only)
i) Create transport set and extract content to transport tables (using portal exp/imp feature from GUI)
ii) Move transport set from source to target (using portal exp/imp command line tool)
iii) copy dump file and script file from source to target instance
iv) Run command line script to import data from dump file to transport tables on target instance
v) Import objects from transport tables to portal repository via GUI using Transport Set Manager Portlet

F) Move applications from a test middle tier with Identity Management and a product Metadata Repository to an existing production environment with Identity Management
========================================

As shown in figure, this migration from test to production assume that ; You have an existing production Instance which already had Middle tier, Identity Management and metadata repository.

Remaining steps on how to migrate them coming soon ….

If you have any doubts in above topic or any other topic, leave a comment and I’ll get back to you.

1Z0-233 Dump: Install Patch and Maintain Applications : AD

Here is list of few exam questions which you can encounter in 1Z0-233 Install, Patch and Maintain Oracle Applications specific to AD Utility. Question mentioned here are to test your knowledge w.r.t. Oracle Applications. These certification questions are developed by me to get better understanding of Oracle Applications and to focus on key points of apps which we miss while reading.

This post cover question on two AD Utility License Manager & Splicer so test your Skills

Q: Whats is use of license manager ?
Note* In Oracle Application 1Z0-233 there is no descriptive type questions, this is to make you familiarize with various ad utilities as We want you to understand Apps with Certification

Q: License manager can be used to change base language you use for business transaction ?
a)
True b) False

Q: What information you can get from License Manager Reports ?
a)
Licensed/Shared Products b) Country-Specific Functionalities c) Languages d) All of above

Q: Once a product or component has been registered, you can use License Manager to de-register it
a) True b) False

Q: What is AD Splicer and how it is different from License Manager ?

Q: You can use AD Splicer to add custom products ?
a)
True b) False

Q: Which of these are AD Splicer control file ? (Choose Two answer)
a) Product Registration File b) Product Definition File c) Product Configuration File d) Product ID File

Q: You must run AD Splicer for each APPL_TOP and database combination in multinode Installation ?
a) True b) False

This is just a sample of huge Inventory of Oracle Apps DBA Certification Question we have for 1Z0-233 track. If you like to see more questions in future about Oracle Apps DBA certification Question (1Z0-233 dump) kindly leave your comment at end of this post.

Configure Oracle Dataguard

Today I am going to cover step by step configuration for Oracle Dataguard & may be in next or future posts I will discuss on common mistakes which you can do while configure dataguard / standby database.

Below steps are based on assumptions that Primary Database is on Machine1.domain.com & Standby database is on Machine2.domain.com . Database Instance Name is PROD and database listener is listening on port 1525. Mount point on primary & standby database are same (If they are not you need to set parameter db_file_convert)

Assumptions
I am assuming using LGWR, ASYNC option with log shipping service which means ,
LGWR (Log Writer process will be used to write to standby site instead of ARC archiver process)
ASYNC (Redo logs to standby is asynchronous to primary site)

You may have to change options with log shipping service (LOG_ARCHIVE_DEST_n) depending on data protection mode you wish to choose. (I am using Maximum Performance Mode - Default Mode)

Enable Archive log
For standby database configuration your primary database should be running in achieve log mode. In order to convert your primary database into archive log mode follow these steps

SQL> SHUTDOWN
SQL> STARTUP MOUNT
SQL> ALTER DATABASE ARCHIVELOG;
SQL> ALTER DATABASE OPEN;

SQL> alter system set LOG_ARCHIVE_DEST_1 =’LOCATION=/u01/oracle/data/arch’ scope=spfile; (I am assuming that you are using spfile here , if you are using pfile skip scope=spfile)

SQL> alter system set LOG_ARCHIVE_DEST_2 =’SERVICE=PROD_remote1.domain.com LGWR ASYNC REOPEN=60′ scope=spfile; (We will create above TNS Alias in next step)
SQL> alter system log_archive_dest_2=’DEFER’ (Defer this until you have standby system Up)

SQL> shutdown immediate
SQL> startup

You should see archive logs generated after this on standby site

Enable Force Logging
You should enable Force logging in primary database else if some transaction which doesn’t generate redo log can corrupt your standby database. (Careful in OLTP transactions or long running requests in Apps)
SQL> ALTER DATABASE FORCE LOGGING;

Oracle Dataguard in Apps 11i E-Business Suite as Disaster Recovery

Today lets conclude dataguard/standby configuration & look at Metalink note on Dataguard configuration in Apps 11i with database 9i & 10g.After creating standby control file and moving datafiles, redo log, control file,tnsnames.ora to standby site , start standby database as mentioned below using standby control file.

SQL> startup mount

In order to put standby database in managed recovery you can use

SQL> ALTER DATABASE RECOVER MANAGED STANDBY DATABASE DISCONNECT FROM SESSION; (On standby site)

To Cancel recovery you can use
SQL> ALTER DATABASE RECOVER MANAGED STANDBY DATABASE CANCEL;

All these sql’s are available in Standby Configuration guide so your can refer guide mentioned in my first post on standby database.

Failover/Switchover
Failover is used if you loose your primary database or wish to break relationship between primary & standby database & convert standby database in to primary database.
Switchover is used to change role of primary to standby & vice versa.

For configuring Dataguard as Disaster Recovery solution in Oracle Applications 11i use Metalink Note # 216212.1 Business Continuity for Oracle Applications Release 11i, Database Releases 9i and 10g

Next level of Business Continuity is Application Server Guard (Currently for Standalone Application Server only) which includes middle tier recovery including database. AS Guard (Application Server Guard) also called as DSA is used for seamless Integration of Disaster Recovery solution for both Middle Tier & Database Tier. I am going to cover how to configure AS Guard in future.

Stay tuned to learn how to configure Single Sign On (SSO) access to HTMLDB / Apex Applications ……

Change Oracle APPS Password : FNDCPASS

With Product Family ATG version H Roll Up 3 , Oracle Introduced New Option in FNDCPASS which is ALLORACLE to Change password of all Schema provided by Oracle Application products. These are basically below three category password
–These are mainly schema password for products like AP, GL, AR (These are also termed as of mode ORACLE )
–Password for APPLSYS and APPS (Same password for both schema) . This is also called as Apps Password (used during CM startup)
–Password for account APPLSYSPUB

How to change Oracle Applications Products/Schema Password including APPS ?
As most of you might already be aware that you use FNDCPASS utility on Concurrent Manager Node.
FNDCPASS logon 0 Y system/password mode username new_password
Where MODE is SYSTEM/USER/ORACLE/ALLORACLE (Introduced with patch 4745998)

Will ALLORACLE mode change other schema passwords like CTXSYS, MDSYS, PORTAL..,SYS, SYSTEM, SCOTT, Application User like AtulKumar …. ??

No ALLORACLE mode will change only schemas mentioned in paragraph 1 and will not change passwords for schemas like CTXSYS, MDSYS, SYS, SYSTEM…..

Is previous Mode SYSTEM/USER/ORACLE still available with FNDCPASS ?
Yes

How to get ALLORACLE mode in FNDCPASS ?
Apply Oracle Apps patch 4745998

What files to change after changing Apps Password ?
You use FNDCPASS apps/apps 0 Y system/manager SYSTEM APPLSYS WELCOME to change Apps Password
–Once you change apps password you need to change apps password stored in file wdbsvr.app at $IAS_ORACLE_HOME/Apache/modplsql/cfg

–In some instances you might have to change in CGIcmd.dat at $ORACLE_HOME/reports60/server

–You also have to change in any custom concurrent manager start up script (If you have any)

–If you have configured E-Business Suite with 10g Application Server SSO/OID then after changing APPS password, update provisioning profile with new apps password

oidprovtool operation=modify \
ldap_host={OID Server hostname} ldap_port={OID Server Port} \ ldap_user_dn=”cn=orcladmin” ldap_user_password={orcladmin Password} \ application_dn=” {The LDAP distinguished name of the application}” \ interface_connect_info={E-Business Suite connect info of the format, host:port:Sid:username:password}

after changing Apps password bounce Concurrent Managers.

Apps Read only Schema in Oracle Applications

In this article I have discussed how to create and maintain a read only schema for APPS in Oracle eBusiness Suite. Whilst in the past I have known clients to implement this using synonyms. However the approach discussed below is designed without the need of having to create a single synonym in APPS_QUERYschema.

Step 1
Create the read-only schema, in this case lets call it APPS_QUERY.

Step 2.
Surely, the schema created in above Step 1 will be given read only grants to objects in apps. There will be cases where the grant command might fail. To monitor such failures create a table as below
conn xx_g4g/&2 ;
--For APPS_QUERY. This table will capture the exceptions during Grants
PROMPT create table XX_GRANTS_FAIL_APPS_QUERY
create table XX_GRANTS_FAIL_APPS_QUERY (
object_name VARCHAR2(100)
,sqlerrm varchar2(2000)
,creation_date DATE
);


grant all on XX_GRANTS_FAIL_APPS_QUERY to apps with grant option;

grant select on XX_GRANTS_FAIL_APPS_QUERY to apps_query ;

Step 3
In this step we grant select on all the existing views and synonyms in apps schema to apps_query.

conn apps/&1 ;

PROMPT This can take upto 15-30 minutes
PROMPT Granting SELECT on All synonyms and views to apps_query
DECLARE
--One off script to execute grants to apps_query
v_error VARCHAR2(2000);
BEGIN

FOR p_rec IN (SELECT *
FROM all_objects
WHERE owner = 'APPS'
AND object_type IN ('SYNONYM', 'VIEW')
AND object_name NOT LIKE '%_S')
LOOP
BEGIN
EXECUTE IMMEDIATE 'grant select on ' || p_rec.object_name ||
' to apps_query';
EXCEPTION
WHEN OTHERS THEN
v_error := substr(SQLERRM, 1, 2000);
INSERT INTO bes.XX_GRANTS_FAIL_apps_query
(object_name
,SQLERRM
,creation_date
)
VALUES
(p_rec.object_name
,v_error
,sysdate
);
END;
END LOOP;
COMMIT;
END;
/


Step 4
Write a after logon trigger on apps_query schema. The main purpose of this trigger is to alter the session to apps schema, such that the CurrentSchema will be set to apps for the session(whilst retaining apps_query restrictions).In doing so your logon will retain the permissions of apps_query schema(read_only). Howerver it will be able to reference the apps objects with exactly the same name as does a direct connection to apps schema.


conn apps/&1 ;
PROMPT CREATE OR REPLACE TRIGGER xx_apps_query_logon_trg
CREATE OR REPLACE TRIGGER xx_apps_query_logon_trg
--16Jun2006 By Anil Passi
--Trigger to toggle schema to apps, but yet retaining apps_query resitrictions
--Also sets the org_id
AFTER logon ON apps_query.SCHEMA
DECLARE
BEGIN
EXECUTE IMMEDIATE
'declare begin ' ||
'dbms_application_info.set_client_info ( 101 ); end;';
EXECUTE IMMEDIATE 'ALTER SESSION SET CURRENT_SCHEMA =APPS';
END;
/


Step 5
Create a Trigger on the apps schema to issue select only grants for all new views and synonyms. Please note that I am excluding grants for sequences. SELECT grants for views and synonyms will be provided to apps_query as and when such objects are created in APPS. Please note that, all the APPS objects (views and synonyms) that existed in APPS schema prior to the implementation of this design, would have been granted read-only access to apps_query in Step 2.

conn apps/&1 ;
PROMPT CREATE OR REPLACE TRIGGER xx_grant_apps_query
CREATE OR REPLACE TRIGGER xx_grant_apps_query
--16Jun2006 By Anil Passi
--
AFTER CREATE ON APPS.SCHEMA
DECLARE
l_str VARCHAR2(255);
l_job NUMBER;
BEGIN
IF (ora_dict_obj_type IN ('SYNONYM', 'VIEW'))
AND (ora_dict_obj_name NOT LIKE '%_S')
THEN
l_str := 'execute immediate "grant select on ' || ora_dict_obj_name ||
' to apps_query";';
dbms_job.submit(l_job, REPLACE(l_str, '"', ''''));
END IF;
END;
/


Some notes for this design

Note1
You need to ensure that the schema created in Step 1 has very limited permissions. Most importantly it must not be given grant for “EXECUTE/CREATE ANY PROCEDURE”. You will need to agree with your DBAs upfront for the permissions,

Note 2
Only views and synonyms will be granted access. Objects in your xx_g4g(bespoke) schema should have their synonyms in apps already in place.

Note 3
If your site has multi org enabled, you will then have to set the org I'd after loggiong on to apps query schema. In case you have only one single ORG_ID, then would have been set as in Step 4 above.

Note 4
ALTER SESSION SET CURRENT_SCHEMA =APPS
This facilitates users to run their queries as if they were connected to apps schema. However, their previliges will be restricted to those of apps_query

Note 5
It is assumed that ALTER SESSION privilege will exist for APPS_QUERY schema.

Upgrade Oracle Applications to 11.5.10.2

Here is quick post on document/notes you should refer to upgrade your Oracle Applications to version 11.5.10.2

1. Upgrade of Oracle Application to 11.5.10.2 from previous release of 11i (11.5.5 to 11.5.9) should be done by applying maintenance pack i.e. Patch # 3480000 and few other prereq. & post patch steps. Follow Metalink Note # 316365.1

2. Your application should be on AD minipack I version 2 i.e. 11.AD.I.2 which is available via patch # 4337683 so first apply patch 4337683. (If you are not sure if you already have AD.I.2 or not query AD_BUGS table)

3. If you are planning to merge prereq. patches, NLS patches and other functional patches with 11.5.10.2 (3480000), note that AD.I.2 4337683 should not be merged as it is not possible to merge AD patches.

4. If you are already on 11.5.10 and wish to upgrade to 11.5.10.2, simply apply patch u3480000.drv using adpatch utility (316366.1)

Some/All/Major of the blog content is not mine and i'm not the writer of it, all rights reserved to the authors.